Humidity - your #1 3D printing enemy!

The water vapor in the air - also known as the "Relative Humidity" - can be detrimental both to the print quality and to your filament. High relative humidity (RH) will cause stringing, popping, and poor mechanical properties.
We have observed the best print quality below 45 % relative humidity (RH). At levels above 55-60 %, you will likely see problems. At 75 % and above your print will likely be very stringy, if it is successful at all. Or as you would say in New Zealand - it all turns to custard!
Humans are quite poor at feeling the level of relative humidity, unless it is very dry or very damp. You will need a humidity gauge. Many indoor digital thermometers also show relative humidity, or you can buy a gauge in our store.
This page will show you how to decrease the relative humidity in your print space and improve your print quality.

What is relative humidity?
"Relative humidity" (RH) is a measure of how much water vapor the air contains in relation to how much it can contain at that specific temperature. If you increase the temperature but not change the amount of water in the air, the RH value will decrease because warmer air can hold more water. If you instead decrease the temperature but keep the amount of water the same, the RH value will increase because the air can hold less water. If you keep decreasing the temperature you will eventually reach the dew point, and water will start condensating on surfaces. There is more water in the air than the air can hold, so it falls out as dew.
Humans typically find RH levels of 30-60 % comfortable, but RH levels upwards of 100 % are not unusual in many climates. You can read more about relative humidity on Wikipedia (link opens in new tab) if you are curious.
"Temperamental" filaments - it is likely the humidity that varies!
You may have heard that some people call certain filaments such as PETG “temperamental”. You may also have experienced first hand how some days things just don’t want to print correctly, no matter what type of filament you use; it gets all stringy and bumpy, or come loose from the bed. Or perhaps it failed overnight, despite it was printing great when you went to bed. We have certainly teared our hair out over this, and it took us years to realize that all these problems are often caused by one single thing – the ambient relative humidity! As soon as the relative humidity goes above 50-60 %, we observe the print quality declining.
Humans are not very good at sensing humidity; we are comfortable in a large range of relative humidity. Your 3D printer on the other hand, is not! If your laundry takes a long time to dry, or the papers jam in your regular paper printer, the humidity is probably way too high for your 3D printer.
If you live in a notorious humid climate such as Waikato New Zealand (where we are based), Florida, Sweden, or many other places in the world, you most likely need to take some measures to keep your printer space dry. However, some office buildings are have very well controlled indoor climate, and you can probably skip the whole page. Although, you might still want to check out the enclosure designs that will keep both dust and curious cats off your printers, as well as some advice for proper storage of your filament spools.
Quick tips:
-
Get a humidity gauge!
Don’t struggle in the dark – get a temperature and humidity gauge so you know what you have to work with! The typical cheap indoor/outdoor gauge that you get in a hardware store or department store typically shows both temperature and humidity, and is worth its weight in gold. You will need an idea of the humidity in your printing room to determine what you need to do. -
Turn up heat and/or air conditioning!
It appears 3D printers are sensitive to the relative humidity, rather than the absolute humidity of the air. The relative humidity is directly connected to the temperature of the air. If you increase the temperature indoors by turning up the heat, the relative humidity will go down. However, if you are in a hot and humid climate like in Florida summer, turning up the air conditioner will also decrease the humidity.
Important - watch out for heating and cooling systems that turn off during the night – the increase in relative humidity might make your print fail! It took us years to figure out that this was the cause of prints predominately failing at nighttime at our old house. -
Get a dehumidifier!
A dehumidifier is much more cost-effective way to decrease the relative humidity of your printing room. The price of dehumidifiers very greatly – shop around and don’t forget to check out the local second hand market! -
Build an enclosure for your printer!
Why dehumidify the whole room when you really just need to keep the air surrounding the printer dry? An enclosure will help keep the humidity low and the temperature even around the printer. An enclosure is particularly effective if your printer is placed in the basement, the garage, or the backyard shed. You will find ideas, designs, and instructions for enclosures further down on this page. You can even put a room de-humidifier inside the enclosure. -
Store your filaments correctly!
Filament will rapidly absorb moisture from the air when taken out of the bag. Within a few hours in humid air, the print quality can degrade. Keep the spools in sealed bags or sealed plastic bins together with desiccant such as silica gel. Re-activate the desiccant by drying it regularly (it is easiest done in a food dehydrator! Dry them for 24 hours, then place the packages in a plastic bag or sealed plastic box). Note: Even freshly opened filament can have absorbed moisture through the bag during transport and storage, and may need drying. Just because a filament spool is freshly opened, it doesn't mean it is dry. The plastic bag is just a thin film, and moisture will eventually diffuse through it and into the filament. -
Dry your filaments! (Easier said than done, we know)
There are plenty of filament dryers on the market, and you will find lots of DIY solutions online.
Keep your filaments dry with correct storage!
Yes, it looks really cool to hang your filament spools on the wall, but it is a terrible way of storing them! They need to be in zip lock bags or sealed plastic containers. I personally like to keep the spools in transparent plastic bins. I sort them by colour and/or material, then put desiccant bags (typically silica gel) in each bin. To keep the environment dry, make sure to close the lid immediately after you have taken a spool in or out.
Build an enclosure
Enclosures can be simple, and they can be elaborate. You can buy commercially manufactured enclosures from some of the 3D printer retailers. It is really up to you what you prefer, but here are a few enclosures that we have built.
Important: Ensure there is some amount of ventilation in your enclosure design. Too high temperature inside the enclosure will increase the risk of electrical failure and even electrical fire. You also don't want any sort of gas of vapor build-up inside the enclosure. A free-hanging plastic curtain will allow for some ventilation. If you have a zippered door, make sure to don't zip it completely shut when the printer is running.
Wooden frame with 3D printed corners
This is a simple but elegant design made from wood and plastic sheeting we built in the early days of KiwiFil. It holds up to three printers and a large dehumidifier.
The frame was made from discarded wood from a nearby door manufacturer connected with 3D printed corners. The plastic is two "drum liners" (thick plastic bags) that were cut opened and held in place with a few thumb tacks. A low-voltage LED strip makes it easier to see.
The front plastic sheet is only connected at the top. It is easy to lift and stick your head in to start your print. The enclosure also dampens the sound, which is great because we had it in our living room/lounge.


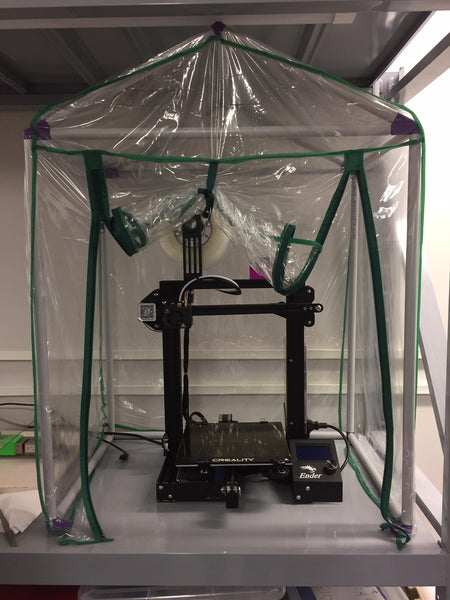
"Greenhouse"
Another solution is to use a plastic film greenhouse. We bought this from AliExpress for a few dollars and it just fits a Creality Ender 3 printer. It came without a frame, so we made one from 3D printed corners and electrical conduit (plastic pipes).
If you choose this solution, leave about half the zippers unzipped to ensure you get some ventilation and don't overheat the printer.

Rigid-wall cabinet
You can also build a nice cabinet from rigid walls. It is a bit more work, but can be very nice.
Covered shelving unit
The simplest solution is to put your printer inside a shelving unit and just drape transparent plastics over it.
(Hopefully) happy printing!
// Eva